Applies to:
Professional Hosting
Universal Hosting
WordPress Hosting
Difficulty:
Easy
Time Needed:
5 minutes
Introduction
This is a quick step-by-step guide to setting up email on Mac Mail.
Please note: You need to have created a mailbox for your account as detailed at ‘How to manage your email addresses’ before you can set up email your device.
How to setup email on Mac Mail
STEP 1
Open Mac Mail
Firstly, you’ll need to open Mac Mail by clicking on the Mail icon, in your dock.

STEP 2
Choose ‘Add Account…’
Once Mac Mail has opened, choose ‘Mail’ from the main menu, then from the drop down menu choose ‘Add Account…’.

STEP 3
Choose ‘Add Another Mail Account…’
You will be presented with a dialog box listing various email providers. Please click on the option labelled ‘Other Mail Account…’ and click on the button labelled ‘Continue’.

STEP 4
Mail Account Details
Enter your mailbox details into the fields provided, making sure that the email address and password match the mailbox details from your 34SP.com account.
When you have entered the relevant details, click ‘Sign In’ to proceed to the next stage.

STEP 5
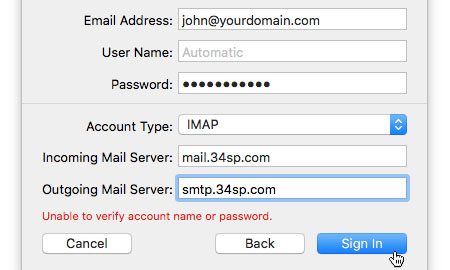
Incoming/Outgoing Mail Server Info
You will be presented with some new form fields to fill in. Firstly, choose your protocol via the ‘Account Type’ dropdown menu (we strongly recommend IMAP).
For ‘Username’ please enter your email address.
For ‘Incoming Mail Server’ please enter ‘mail.34sp.com’.
For ‘Outgoing Mail Server’ please enter ‘smtp.34sp.com’.
When you have entered the relevant details, click ‘Sign In’ to proceed to the next stage.
STEP 6
Select ‘Mail’
You’ll then be asked which apps you want to use with this account. Ensure ‘Mail’ is checked, and click on the button labelled ‘Done’ to complete the setup.

STEP 7
Mac Mail Setup Is Complete
Your mail setup is complete. You may need to restart your mail client for the new settings to take effect. Once completed, you should be able to send and receive email via Mac Mail. To test that this is working, click on the envelope icon in the top left corner, which will receive any emails you have been sent.
