Applies to:
Professional Hosting
Universal Hosting
Reseller Hosting
WordPress Hosting
Difficulty:
Easy
Time Needed:
5 minutes
Introduction
This is a quick step-by-step guide to setting up email on Gmail.
When you setup a POP email account, your emails are downloaded off the server and into your email client. This means once you delete an email via your email client, it is permanently deleted. POP also has limitations, as such we do not recommend using it if you access your email account via multiple devices.
Please note: You need to have created a mailbox for your account as detailed at ‘How to manage your email addresses‘ before you can set up email your device.
How to setup email on Gmail
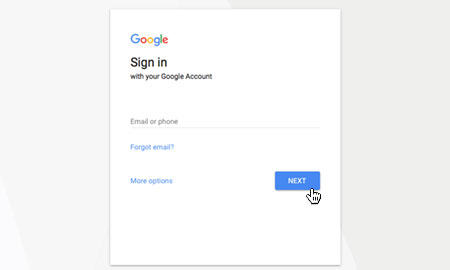
STEP 1
Log in to Gmail
Firstly, you’ll need to log in to your Gmail account at https://mail.google.com.
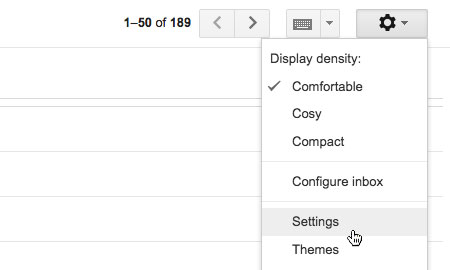
STEP 2
Choose ‘Settings’
Once you have logged in, locate the settings icon (a cog) in the top right-hand corner of the screen and click on it.
Then choose “Settings” from the drop down menu.
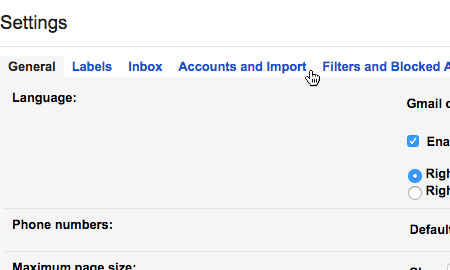
STEP 3
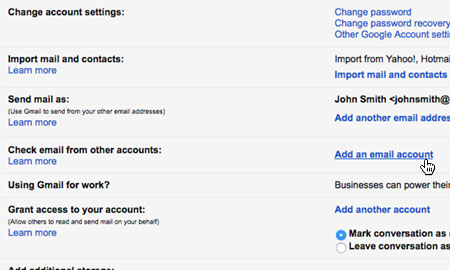
Choose ‘Accounts and Import’
You will be presented with a page of Gmail settings. Please click on the tab at the top of the page, labelled ‘Accounts and Import’.
STEP 4
Choose ‘Add an email account’
Then locate the link labelled ‘Add an email account’and click on it.
STEP 5
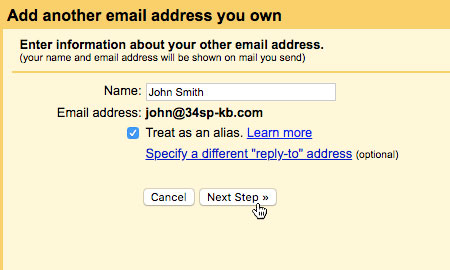
Enter your email address
This will open a pop-up window. Simply enter the email address you wish to setup, in the form field provided. Then click the button labelled ‘Next’.

STEP 6
Choose ‘Import emails from my other account (POP3)’
For the next step, make sure the option labelled ‘Import emails from my other account (POP3)’ is checked, and then click the button labelled ‘Next’.

STEP 7
Your email address details
Then enter your email address details.
For ‘Username’ please enter your full email address. In the field labelled ‘Password’ enter the email address password. In the field labelled ‘POP Server’ please enter mail.34sp.com.
When you have entered the relevant details, click the button labelled ‘Add Account’ to complete the setup.

STEP 8
Setup outgoing mail
Next, you will be asked if you want to be able to send mail from your email address via Gmail. If you wish to do this, simply ensure the ‘Yes’ checkbox is checked, then click on the buttonllabelled ‘Next’.
If you only want to receive email to this address, or do not need to setup outgoing mail, simply ensure the ‘No’checkbox is checked, then click on the button labelled ‘Next’ to complete the setup.

STEP 9
Enter your ‘from’ name
You will then be prompted to fill in your name. This name will appear on any emails you send from this address via Gmail.
STEP 10
Your outgoing mail settings
You then need to enter your outgoing mail settings.
For ‘SMTP Server’ please enter ‘smtp.34sp.com’. For the ‘Username’ simply enter your full email address. In the field labelled ‘Password’ enter the email address password.
When you have entered the relevant details, click the button labelled ‘Add Account’ to complete the setup.

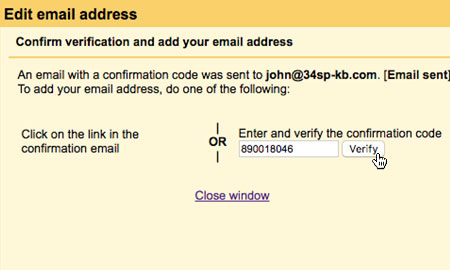
STEP 11
Verify your email address
For the final step, Gmail will send a verification email containing a confirmation code. Simply copy the confimation code and paste into into the field labelled ‘Enter and verify the confirmation code’ to complete your setup.