In part 1 of this series, we setup a blank theme with the Materialize framework. In part 2, we’re going to use customizer.php to add some theme options, and build in our colors and styles for your 34SP.com WordPress website.
Customizer.php
Since WordPress 3.4, the Theme Customization API has made it possible for theme options to be built directly into the “Appearance > Customize” admin screen. This gives the user greater ability to interact with the theme, including a live preview of the options selected, before making the theme live.
We’re going to give our users the ability to select from one of four hand crafted color palettes. Open your functions.php, and add the following to the bottom of the file:
// Add theme options

function material_controls( $wp_customize ) {

// Add a section to customizer.php
	$wp_customize->add_section( 'material_options' ,
		array(
  		'title'      => __( 'Material Options', 'materialized' ),
  		'description' => 'The following theme options are available:',
  		'priority'   => 30,
		)
	);

// Add setting
	$wp_customize->add_setting(
    'material_colors',
    array(
        'default' => 'blue.css',
    )
	);

// Add control
	$wp_customize->add_control(
    'material_color_selector',
    array(
        'label' => 'Color Scheme',
        'section' => 'material_options',
        'settings' => 'material_colors',
        'type' => 'select',
        'choices' => array(
            'blue.css' => 'Blue',
            'red.css' => 'Red',
            'green.css' => 'Green',
            'orange.css' => 'Orange',
        ),
    )
);


}
add_action( 'customize_register', 'material_controls' );
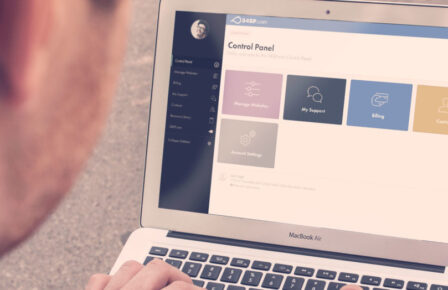
This adds a new section to the customizer just under site title and tagline called “Material Options”. In that section, it creates a drop down selector with four color choices, and it binds them to a setting called “material_colors”. We’re going to use this selection to conditionally enqueue the selected color options. If no color option is selected, we’re going to use blue as the default.
When you view the Customizer screen in your browser now, you’ll see your new section, with our theme options in place:

Settings stored this way can be referenced via the get_theme_mod() function. We want to load a custom color stylesheet based on the selection, so we’re going to make an addition to our materialized_scripts() function, where we enqueue our scripts and styles. At the end of that function, before the closing curly brace, add the following:
	// Check our theme options selections, and load conditional styles
	$themecolors = get_theme_mod( 'material_colors' );

	// Enqueue the selected color schema
	wp_enqueue_style( 'material-colors', get_template_directory_uri() . '/css/'. $themecolors );
Create four new files called blue.css, red.css, green.css, and orange.css. Add them to your /css directory, and we’re ready to build our color palettes!
The Material Grid
Before we move forward on styling, we need to setup our main content and sidebar blocks so that everything sits correctly in our page. To accomplish our primary layout, we’re going to use the Materialize grid system, which is a 12 column row. Modify your index.php to use the following structure:
get_header(); ?>
	<div class="row">
	  <div id="primary" class="content-area col s12 m7 l8">
		<main id="main" class="site-main" role="main">

			<?php if ( have_posts() ) : ?>

				<?php /* Start the Loop */ ?>
					<?php while ( have_posts() ) : the_post(); ?>

					<?php
						/* Include the Post-Format-specific template for the content.
					 	* If you want to override this in a child theme, then include a file
					 	* called content-___.php (where ___ is the Post Format name) and that will be used instead.
					 	*/
						get_template_part( 'content', get_post_format() );
					?>

				<?php endwhile; ?>

				<?php the_posts_navigation(); ?>

			<?php else : ?>

				<?php get_template_part( 'content', 'none' ); ?>

			<?php endif; ?>

			</main><!-- #main -->
		</div><!-- #primary -->

		<?php get_sidebar(); ?>
	</div><!-- /row -->
<?php get_footer(); ?>
There are two important changes to note:
- We’ve wrapped the primary and secondary (sidebar) sections in a .row class
- We’ve assigned a col class and three size classes to the primary div: s12, m7, and l8.
Col is the class materialize uses to indicate this is a column element, and the size attributes indicate small (s), medium (m) and large (l) screens.
We’ll also need to add those classes to our sidebar.php:
<div id="secondary" class="widget-area col s12 m4 l3 offset-l1" role="complementary">
Now we’ve got an 8 column primary content area and 3 column secondary which is offset by 1 column on large screens, and a graceful resizing down to mobile. This gives us a responsive sidebar with some natural spacing without using an additional margin or padding statement.
Styles and Colors
We want our style.css to take priority in some cases, so we need to re-order our enqueue function to load our theme style after materialize.css.
Find this line in the enqueue function:
wp_enqueue_style( 'yourthemename-style', get_stylesheet_uri() );
…and move it to the line following this:
wp_enqueue_style( 'material-style', get_template_directory_uri() . '/css/materialize.css' );
Now we can add our styles. Let’s start by adding a little padding before our content section. In your style.css, add the following:
div#content {
padding-top: 20px;
}
WordPress titles can be verbose, so we’re going to reduce the default font size a bit so longer phrases fit better:
h1.site-title {
margin: 1rem 0;
font-size: 3em;
}

h2.site-description {
font-size: 2.0rem;
line-height: 2.4rem;
margin: 1rem 0 1.424rem 0;
font-weight: 300;
}

h1 {
font-size: 3.2rem;
line-height: 3.8rem;
margin: 2.1rem 0 1.2rem 0;
}

h2 {
  font-size: 3.56rem;
  line-height: 3.916rem;
  margin: 1.78rem 0 1.424rem 0; }

h3 {
  font-size: 2.92rem;
  line-height: 3.212rem;
  margin: 1.46rem 0 1.168rem 0; }

h4 {
  font-size: 2.28rem;
  line-height: 2.508rem;
  margin: 1.14rem 0 0.912rem 0; }

h5 {
  font-size: 1.64rem;
  line-height: 1.804rem;
  margin: 0.82rem 0 0.656rem 0; }

h6 {
  font-size: 1rem;
  line-height: 1.1rem;
  margin: 0.5rem 0 0.4rem 0; }
…and since our stylesheet is taking priority, we need to set the default font in the HTML element:
html {
	font-family: 'roboto',sans-serif;
	-webkit-text-size-adjust: 100%;
	-ms-text-size-adjust:     100%;
}
Finally, let’s add some color. Open up your blue.css, and add the following:
/* Header */

header#masthead {
background: #2196f3;
color: #fff;
}

header#masthead a {
	color: #fff;
}

/* Navigation */

.nav {
color: #fff;
background-color: #64b5f6;
width: 100%;
height: 56px;
line-height: 56px;
overflow: hidden;
}

nav ul li:hover, nav ul li.active {
background-color: #1976d2;
}
Load it up, and you should see something like this:

Transitions and Animations
Reactive animations and transitions are an important part of the Material Design language, so let’s start incorporating them by adding a nice wave reaction to being clicked on each of the menu buttons. WordPress makes it very difficult to modify the individual nav ul li classes without writing your own custom walker function, but fortunately a little bit of JavaScript will accomplish the task neatly. Open your material-custom-scripts.js, and add the following to your (document).ready function:
$('li.menu-item').addClass('waves-effect waves-light');
This targets all list items of the menu-item class, the default wrapper WordPress uses for nav list elements. You can modify the specific selector as needed to apply different transitions across different types of menu elements. Now your theme has its first hints of Material animation:

Card UI
Finally, let’s setup our excerpt blocks for the home page. We’re going to use the “Image Card” element to show our featured image with a title, an excerpt, and some meta information. Because this layout is heavily dependent on a featured image being selected, we’re going to add a blank default image place holder to maintain our minimum height. Create a folder called “img” in your theme directory, and add this file: default.png (800×100, 1.5k).
Next, open your content.php file, and replace the article element with the following:
<article id="post-<?php the_ID(); ?>" <?php post_class(); ?>>
<div class="card">
<div class="card-image">
<?php if ( has_post_thumbnail() ) {
the_post_thumbnail();
} else { ?>
<img src="<?php bloginfo('template_directory'); ?>/img/default.png" alt="<?php the_title(); ?>" />
<?php } ?>
<span class="card-title">
<header class="entry-header">
<?php the_title( sprintf( '<h1 class="entry-title"><a href="%s" rel="bookmark">', esc_url( get_permalink() ) ), '</a></h1>' ); ?>
</header><!-- .entry-header -->
<?php if ( 'post' == get_post_type() ) : ?>
<div class="entry-meta">
<?php yourthemename_posted_on(); ?>
</div><!-- .entry-meta -->
<?php endif; ?>
</span>
</div>
<div class="card-content">
<div class="entry-content">
<?php
/* translators: %s: Name of current post */
if (! is_single()) {
the_excerpt( sprintf(
__( 'Continue reading %s <span class="meta-nav">→</span>', 'immaterial' ),
the_title( '<span class="screen-reader-text">"', '"</span>', false )
) );
} else {
the_content( sprintf(
__( 'Continue reading %s <span class="meta-nav">→</span>', 'immaterial' ),
the_title( '<span class="screen-reader-text">"', '"</span>', false )
) );
}
?>
<?php
wp_link_pages( array(
'before' => '<div class="page-links">' . __( 'Pages:', 'immaterial' ),
'after' => '</div>',
) );
?>
</div><!-- .entry-content -->
</div>
<div class="card-action">
<footer class="entry-footer">
<?php yourthemename_entry_footer(); ?>
</footer><!-- .entry-footer -->
</div>
</article><!-- #post-## -->
This wraps the card object around our posts. Be sure to modify your posted_on and entry_footer function names to match your theme name if you’re cutting and pasting.
Now we need to add a little style to make the title and footer block easier to read, and to match it to our color schema. Open up your style.css file, and add the following:
/* card display */

.card {
  position: relative;
  overflow: hidden;
  margin: 0.5rem 0 1rem 0;
  background-color: #fff;
  -webkit-box-sizing: border-box;
  -moz-box-sizing: border-box;
  box-sizing: border-box;
  -webkit-border-radius: 2px;
  -moz-border-radius: 2px;
  border-radius: 2px;
  background-clip: padding-box;
  }

.card .card-title {
background: rgba(255,255,255,.8);
}

.card .card-image .card-title {
padding: 0px 20px 20px;
}

.card a {
-webkit-transition: color 0.3s ease;
-moz-transition: color 0.3s ease;
-o-transition: color 0.3s ease;
-ms-transition: color 0.3s ease;
transition: color 0.3s ease;
text-transform: none;
}

.card-title h1.entry-title {
font-size: 2.2rem;
text-transform: none;
line-height: 2.8rem;
margin: 1.8rem 0 1rem 0;
}

.card-title .entry-meta {
  font-size: 1.3rem;
}

.card .card-content p {
  margin: 0;
  margin-bottom: 20px;
  font-size: 1.1rem;
  color: #666;
}

.card-content ul {
margin: 0;
}
Then, in your blue.css, add our color tweaks:
/* Content */

.card .card-title, .card .card-title a {
	color: #1976d2;
}

.card a:hover {
  color: #64b5f6;
}

.card-action {
background: #e3f2fd;
}

.card a {
  color: #039be5;
  margin-right: 0;
  -webkit-transition: color 0.3s ease;
  -moz-transition: color 0.3s ease;
  -o-transition: color 0.3s ease;
  -ms-transition: color 0.3s ease;
  transition: color 0.3s ease;
  text-transform: uppercase;
}
The default CSS in Underscores hides the author byline in archive displays, but if we’re a multi-author blog, we probably want to show them. Find:
.byline,
.updated:not(.published) {
	display: none;
}
…and remove the byline class.
The Material image card title uses absolute positioning by default, which becomes a problem on small screens, because long titles can be clipped. We need to use a slightly different treatment, so we’re going to add a media query to alter the display for small screens:
@media screen and (max-width: 568px) {

.card .card-image .card-title {
  position: relative;
  bottom: 0;
  left: 0;
  padding: 0;
	}

h1.entry-title {
  font-size: 2.0rem;
  text-transform: none;
  line-height: 2.4rem;
  padding: 0 1.2rem;
	}

.entry-meta {
  padding: 0 1.2rem;
  font-size: 22px;
	}

}
Perfect! At this point, our home page should show our posts as nicely formatted image card objects. The theme is starting to come together, but we still have some structural pieces to take care of. Starting in part 3, we’ll:
- Add the card UI to posts and pages
- Style our sidebar with cards and collections
- Add Material icons and additional animations
- Implement Material form elements in a custom comments section
See anything here that could be done better? Let us know in the comments.
Related posts

Changes to the 34SP.com login process
If you log in to account.34sp.com page today, you may notice a new added security feature. Starting today all users will now face…
Updating your stored credit or debit card for recurring billing
You may have recently received an email from us asking you to update a stored debit or credit card. This…

More than 100x performance – why you need to choose optimized WordPress Hosting
100x performance; it’s a big and bold claim! If you’ve spent time researching web hosting options, you’ve no…