Applies to:
Domains
Difficulty:
Easy
Time Needed:
70 minutes
Introduction
This is a quick step-by-step guide to setting up email on G Suite (formally Google Apps) with your 34SP.com domain name.
As default, 34SP.com domain names do not come with email services. However, all 34SP.com domain names work seamlessly with Google’s Gmail, so you can create an email address using your domain name and use Gmail to send and receive emails via that address.
Sign up to Google’s G Suite
STEP 1
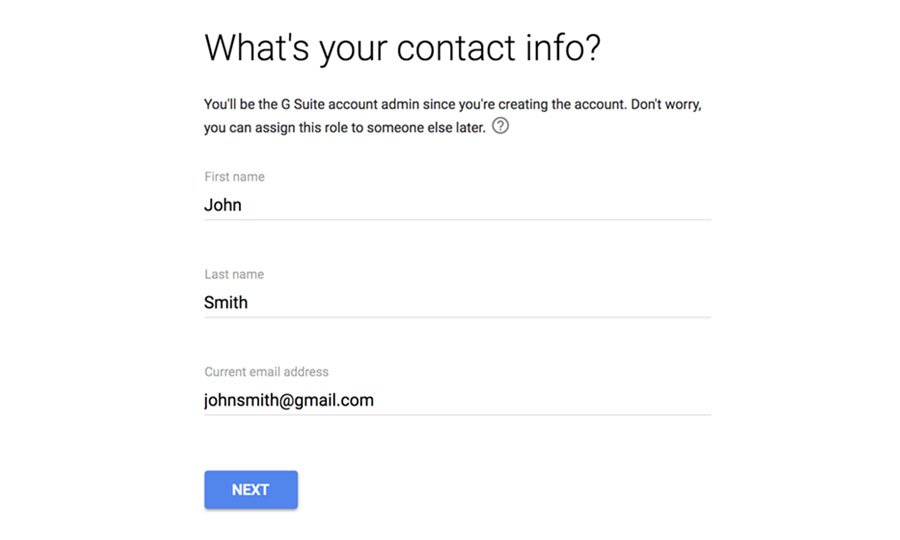
Create a G Suite account
Firstly, you need to sign up to an account with Google’s G Suite service, which can be done via their product selection page.
After you have chosen the package you wish to use, follow the signup process.
STEP 2
Use your domain name
During sign up, you will be asked to ‘Does your business have a domain?’. Click on the button labelled ‘Yes, I have one I can use’ and then enter your domain name into the field labelled ‘Your domain name’.
Then you will be asked to confirm you wish to use your domain name with G Suite. Proceed by simply clicking the button labelled ‘Next’.
You can then complete Google’s sign up/checkout process by following the on-screen instructions.

STEP 3
Begin the setup process
After you have created a Google account, you will see the message ‘Your G Suite account has been created’. Simply click on the button labelled ‘Continue to setup’ to proceed.

STEP 4
Add users
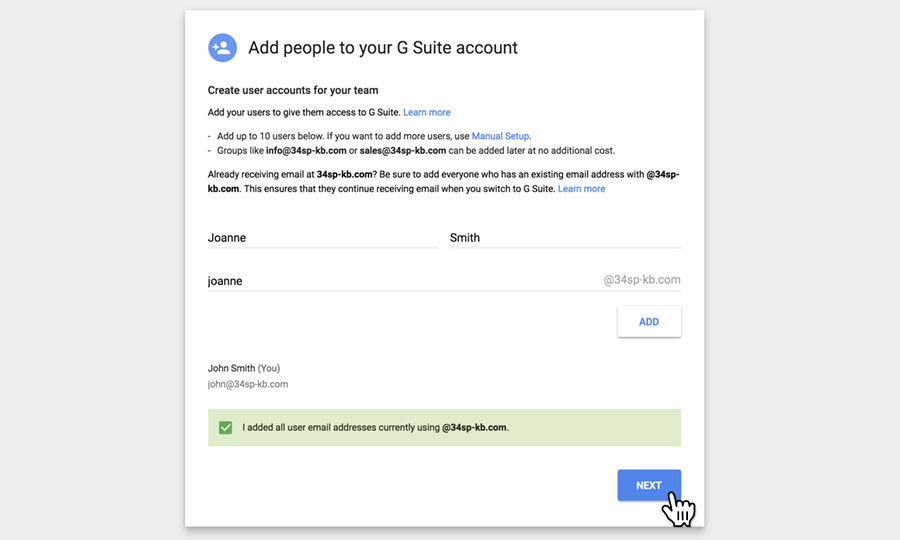
If you wish to add setup more than one email address to work with your domain, simply add them via Google G Suite.
Firstly, under the section labelled ‘Add people to your G Suite account’, click on the button labelled ‘Start’.
If you don’t wish to add more email addresses, just skip to step 6.

STEP 5
Add your users
Simply enter your user’s first name, surname and the email address you wish to create for them, into the fields provided. Then click the button labelled ‘Add’ to add your new user.
You can add as many users as your plan allows. When you have finished adding your users, check the checkbox labelled ‘I added all user email addresses currently using yourdomain.com.’, then click the button labelled ‘Next’ to proceed.
STEP 6
Verify your domain
You’ll then be presented with a checklist of steps you need to complete, in order to get your domain to work with Google.
Navigate to the 3rd item on the checklist, that reads “Add a new TXT record to your domain”, locate the verification code (the long code that starts ‘google-site-verification’) and copy the entire code to your clipboard.

STEP 7
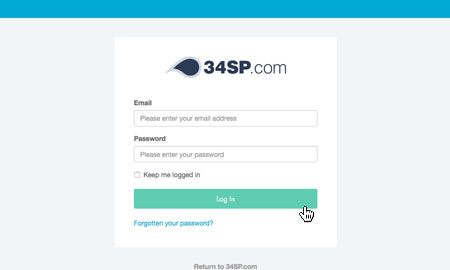
Log in to your 34SP.com account
You will then need to set up your domain to work with G Suite. This needs to be done via the 34SP.com control panel.
Firstly, you’ll need to open a new tab in your browser and log in to your 34SP.com account at https://account.34sp.com.
STEP 8
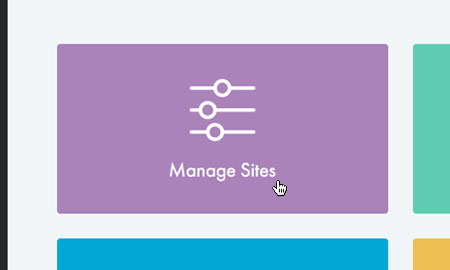
Choose ‘Manage Sites’
Once you have logged in, click on the ‘Manage Sites’icon. This will bring up a list of websites or domain names you have in your 34SP.com account. Simply choose the website or domain name to wish to edit by clicking on it.
STEP 9
Choose ‘Manage DNS’
After you have clicked on the website or domain name you wish to edit, you will be presented with a page of icons. Please click on the tab labelled ‘DNS’.

STEP 10
Add a new DNS record
Add a new DNS record by clicking on the button labelled ‘Add DNS Record’.

STEP 11
Create new TXT record
Create a new TXT record for your domains DNS by clicking on the dropdown menu labelled ‘Record Type’and choosing TXT.
In the field labelled ‘Host’, enter @.
In the field labelled ‘Data’, paste in your Google verification code, that starts google-site-verification.
After you have entered your verification code, simply click on the button labelled ‘Add DNS Record’.

STEP 12
Choose ‘Google MX Records’
You’ll then return to the DNS overview page. On the DNS navigation, click on the tab labelled ‘Google MX Records’.

STEP 13
Add Google MX Records
Add update your domain name’s DNS records to work with Google’s email service, simply click the button labelled ‘Add Google MX Records’.
Your domain name’s DNS MX records will then be updated.

STEP 14
Verify your domain name with G Suite
Return back to G Suite, and simply tick all remaining the steps so they turn green, then click on the button labelled ‘Verify domain and setup email’ to proceed.

STEP 15
Google domain verification
Google will then begin to verify your domain name. Although Google says this process will take one hour, it can actually take up to 24 hours due to DNS propagation.
Should verification fail the first time you attempt it, click the button labelled ‘Back’ and retry the verification process 24 hours later.

STEP 16
Domain verified
When Google has correctly managed to verify your domain, you will be notified. Simply click the button labelled ‘Next’ to complete your setup and you start using your domain name with G Suite/Gmail.
